> ## Documentation Index
> Fetch the complete documentation index at: https://www.retailnexus.work.gd/llms.txt
> Use this file to discover all available pages before exploring further.
# Reservation System Manual
In this manual, you can see how to setup the reservation system, install it and configuring it.
#### Importing the file to Roblox Studio
Download the product file from the discord server. There's a channel named "Reservation System" under the "Products" folder, where you can download the product file.
Import the file to Roblox Studio by dragging and dropping the file to your experience
Ungroup the model "Reservation System | UNGROUP"
#### Configuring the master settings of the system
Here you can configure the master settings of the system. Go to `RN | Reservation System > Configuration` to configure the system.
##### Configurations
Changes the timeout for check-in after the reservation starts in minutes. Example: if set to 10, you have to check-in to the room within 10 minutes of the reservation starting. The reservation is automatically cancelled after this timeout ends. Default parameter: 10
Changes the maximum time of a reservation in minutes. Example: if `MaxBookingTime` is set to 60, the maximum time for a booking is 60 minutes. Default parameter: 60
Changes the maximum time in minutes before a reservation can be made. Example: if set to 30, the maximum time you can make a reservation in advance is 30 minutes. Default parameter: 30
With this table, you can change different screen and side LED colors for different scenarios. Default parameters:
`Available = Color3.fromRGB(80, 160, 100),`
` Busy = Color3.fromRGB(180, 70, 70),`
` CheckIn = Color3.fromRGB(200, 140, 50),`
` Offline = Color3.fromRGB(100, 100, 100)`
ㅤㅤㅤㅤㅤ
#### Configuring a Reservation Screen's settings
Here you can configure each individual Reservation Screen's settings. Go to `RN | Reservation System > Reservation Screen > Configuration`
Changes the name that will be displayed on the screen.
Changes the maximum number of people that can fit in the room.
ㅤㅤㅤㅤㅤ
### Using the system
Here you can see how you can use the system.
ㅤㅤㅤㅤㅤ
#### Room Available
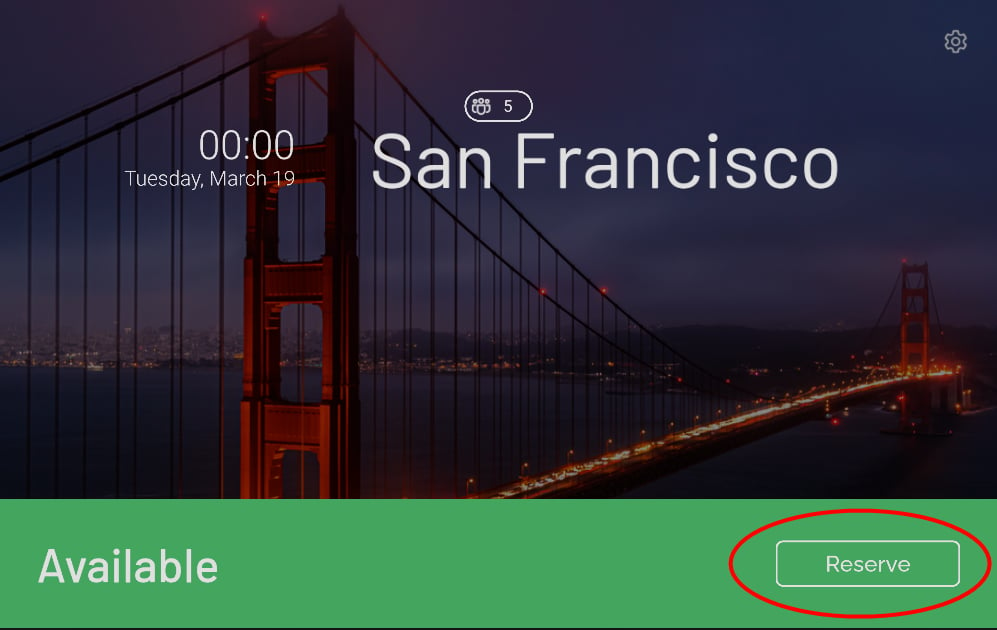
When the room is available, you can see the upcoming reservations and schedule a new reservation. To schedule a new reservation, press "Reserve" to open the reservation menu.
 ㅤㅤㅤㅤㅤ
After pressing "Reserve" this menu will come up on the screen. Here you can make a new reservation.
ㅤㅤㅤㅤㅤ
After pressing "Reserve" this menu will come up on the screen. Here you can make a new reservation.
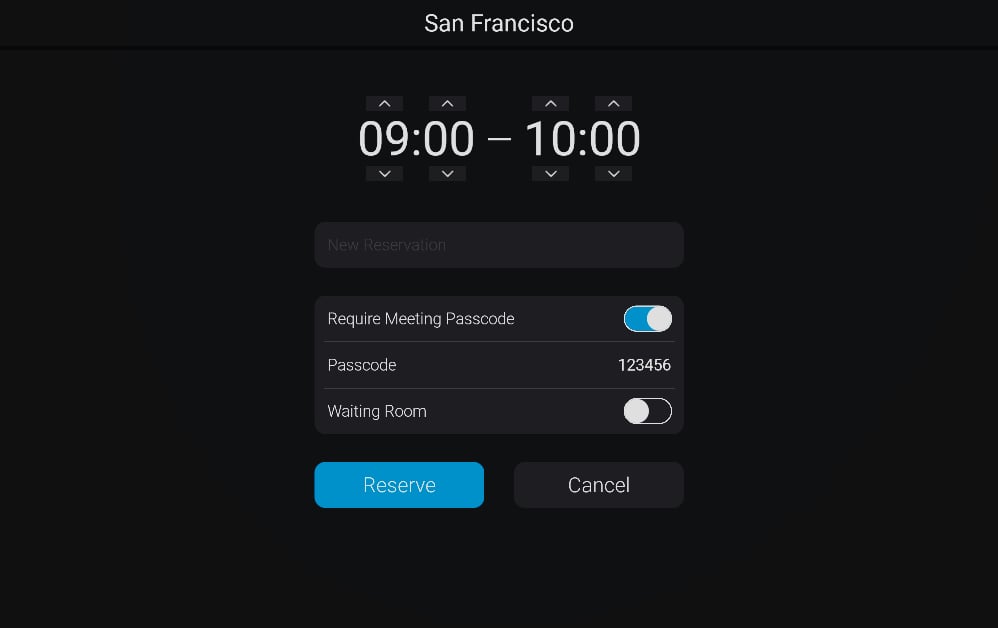 Use the up/down arrows above and below the numbers to change them. The left number is the time that the reservation starts. The right number is the time that the reservation ends.
Click on the "New Reservation" text to open the on-screen keyboard where you can change the reservation name.
You can toggle the "Require Meeting Passcode" if you want there to be a password required when you check-in to the reservation. If Meeting Passcode is toggled, you can click on the "Passcode" field to change the Passcode for check-in. The Passcode is by default randomly generated if you don't modify it.
Click on the "Waiting Room" toggle if you want the reservation room to be a waiting room for the time of the reservation.
Click "Reserve" to complete the reservation. The screen will show a confirmation text before returning to the home screen. If there's a problem with any of the fields in the reservation, the screen will show a notification that the field is filled in incorrectly.
ㅤㅤㅤㅤㅤ
#### Checking in to a reservation
When it is time for a reservation, the screen's and side LED's colors will turn orange or the set color in settings and the button on the screen will change to "Check-in" indicating that you can now check-in to the room. If you do not check-in within the set time in settings, the reservation will be automatically cancelled.
Use the up/down arrows above and below the numbers to change them. The left number is the time that the reservation starts. The right number is the time that the reservation ends.
Click on the "New Reservation" text to open the on-screen keyboard where you can change the reservation name.
You can toggle the "Require Meeting Passcode" if you want there to be a password required when you check-in to the reservation. If Meeting Passcode is toggled, you can click on the "Passcode" field to change the Passcode for check-in. The Passcode is by default randomly generated if you don't modify it.
Click on the "Waiting Room" toggle if you want the reservation room to be a waiting room for the time of the reservation.
Click "Reserve" to complete the reservation. The screen will show a confirmation text before returning to the home screen. If there's a problem with any of the fields in the reservation, the screen will show a notification that the field is filled in incorrectly.
ㅤㅤㅤㅤㅤ
#### Checking in to a reservation
When it is time for a reservation, the screen's and side LED's colors will turn orange or the set color in settings and the button on the screen will change to "Check-in" indicating that you can now check-in to the room. If you do not check-in within the set time in settings, the reservation will be automatically cancelled.
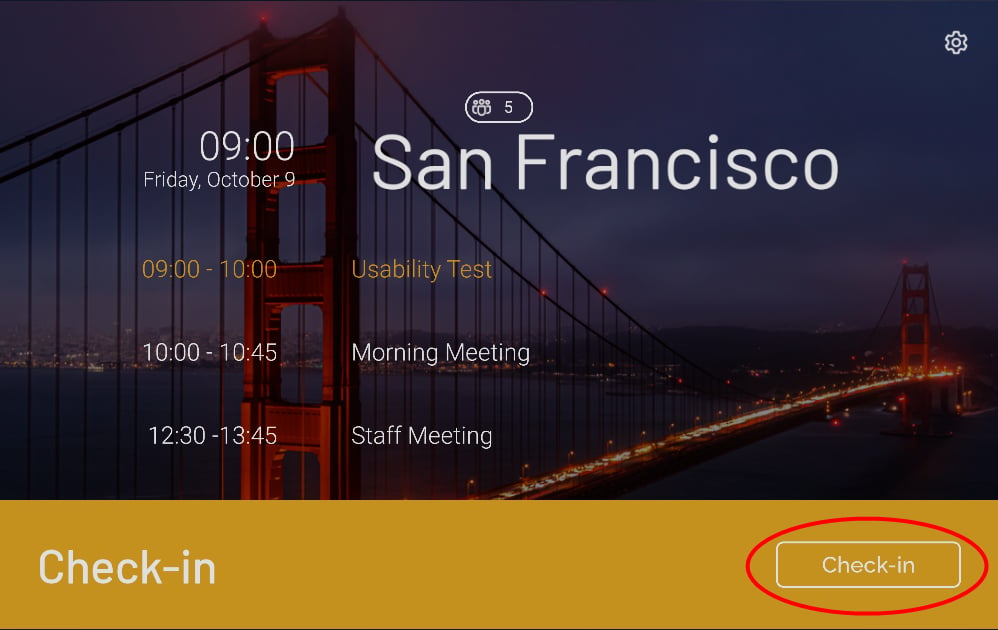 Click "Check-in" to check-in to your reservation. If the reservation has a passcode, the screen will show you a text field where you are required to input the passcode in to.
ㅤㅤㅤㅤㅤ
#### Room Busy
When the room is currently busy, the screen and side LEDs will be red or the set color in settings. When the room is busy, you can release the room early pressing "Release Room" or make a new reservation by pressing "Reserve"
Click "Check-in" to check-in to your reservation. If the reservation has a passcode, the screen will show you a text field where you are required to input the passcode in to.
ㅤㅤㅤㅤㅤ
#### Room Busy
When the room is currently busy, the screen and side LEDs will be red or the set color in settings. When the room is busy, you can release the room early pressing "Release Room" or make a new reservation by pressing "Reserve"
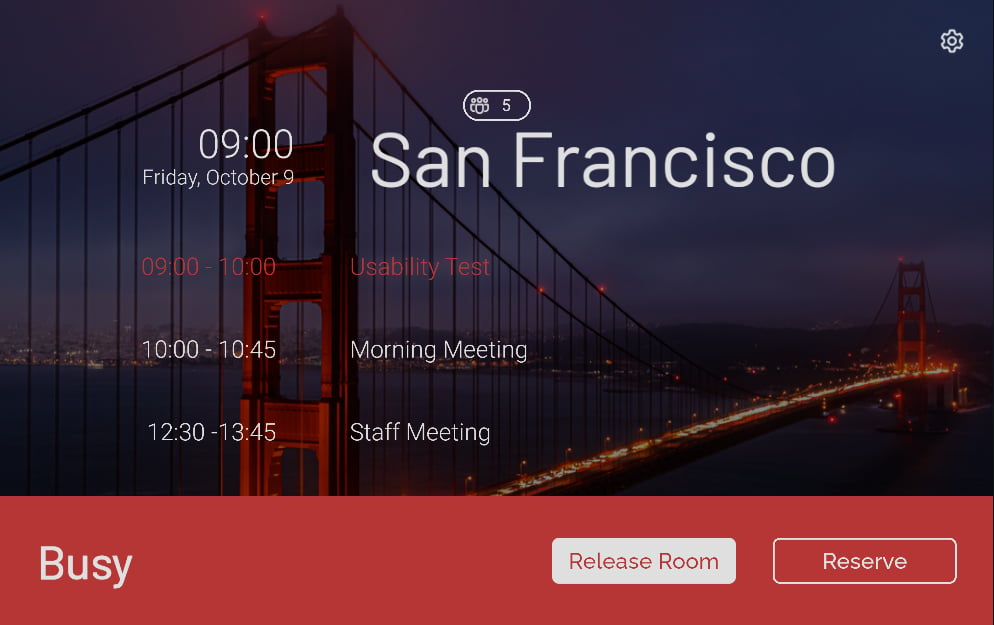 When the reservation ends, the room will automatically be released, and the reservation will be deleted.
ㅤㅤㅤㅤㅤ
#### Deleting a reservation
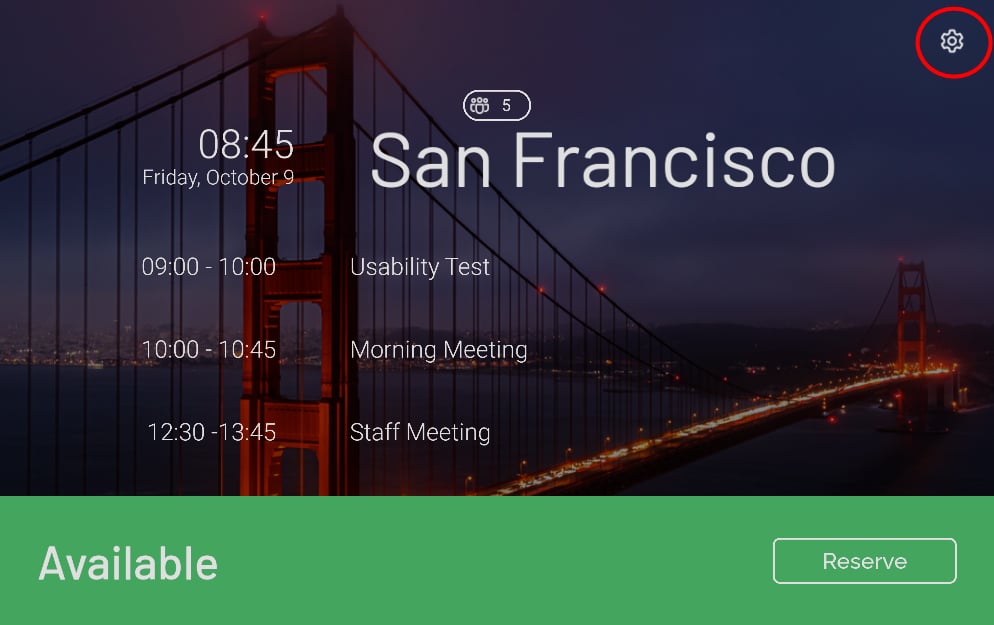
If you want to delete a reservation that you no longer need, press the gear icon in the top-right corner of the screen to open a menu where you can remove reservations.
When the reservation ends, the room will automatically be released, and the reservation will be deleted.
ㅤㅤㅤㅤㅤ
#### Deleting a reservation
If you want to delete a reservation that you no longer need, press the gear icon in the top-right corner of the screen to open a menu where you can remove reservations.
 ㅤㅤㅤㅤㅤ
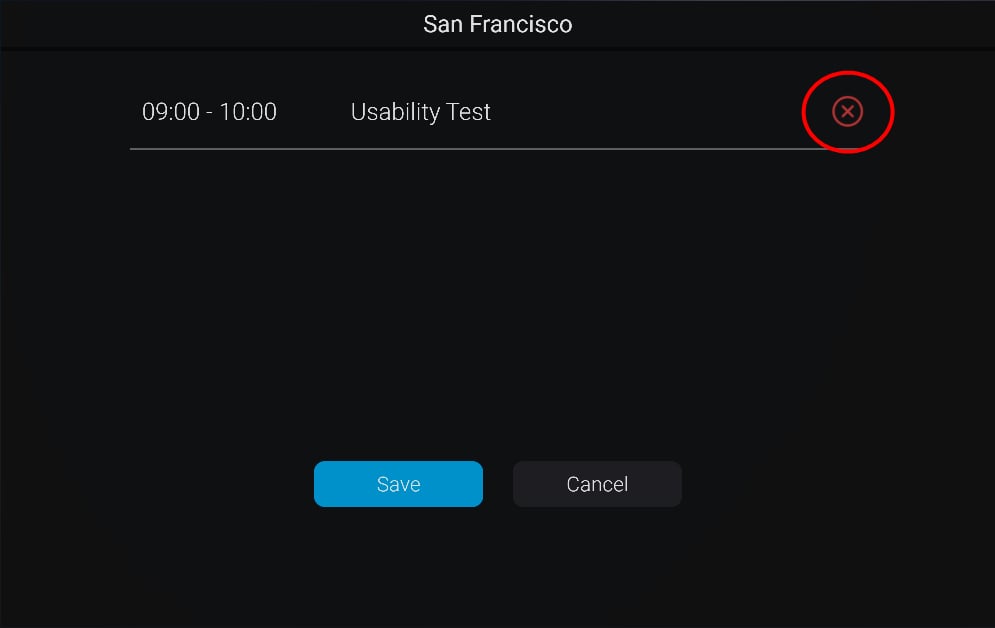
After pressing the gear icon, it will open this menu where you can click the "X" on a reservation to delete it. If the reservation has a passcode, you need to enter the passcode before you can delete the reservation. After deleting reservations, press "Save" to save changes. If you want to cancel deleting a reservation, press cancel.
ㅤㅤㅤㅤㅤ
After pressing the gear icon, it will open this menu where you can click the "X" on a reservation to delete it. If the reservation has a passcode, you need to enter the passcode before you can delete the reservation. After deleting reservations, press "Save" to save changes. If you want to cancel deleting a reservation, press cancel.
 ㅤㅤㅤㅤㅤ
This documentation is built and hosted on [Mintlify](https://mintlify.com), a developer documentation platform.
ㅤㅤㅤㅤㅤ
This documentation is built and hosted on [Mintlify](https://mintlify.com), a developer documentation platform.